So this new thing hit the market recently that I CANNOT WAIT TO TRY…
I mean you know what I’m about to say because you saw the title of this post but DUUUUUUUUDE, Karin markers made paint brush pens!
And I mean – if you know you know why this is so exciting… but if you DON’T know – it’s excitingbecause normally paint pens don’t come with a brush tip!
And as someone who does a lot of window projects and glass projects and signage, this is a huuuuuuuuuuge deal for me. I always have to do “faux calligraphy” on windows and signs because there reeeeeally aren’t many good paint brush pens out there to achieve the thin upstrokes and thick downstrokes.
So for me, this is exceptionally exciting. Having brush pens that are paint pens is…. It’s just so exciting. And not only that… but these can write on other things too and can be used just like normal brush pens….
It’s all just very exciting. Brush pens and paint pens – all of my favourite things in one magical pen!
So anyway, Karin sent me this set of their new Decobrush paint brush pens to try out. I hadn’t even cracked the set open before filming the video for today’s post because I wanted to do a real-time review for you and give you all my honest thoughts!
And a quick disclaimer – no, they did not pay me to make the video or this post!
First Things First…
The links below may be affiliate links where appropriate. This means that your purchase through these links may result in a few cents in payment to me, to support creating further resources like this one! That being said, I will never suggest supplies that I do not personally use and fully recommend.
Supplies Mentions
- Karin Markers Pigment DecoBrush Pens
- Karin Markers BrushMarker Pro Brush Pens
- Glass Panel
- Paper – White, Black, Kraft Cardstock
- Water
- Paper towel
Rather watch than read? No problem! You can watch honest reactions and review in real-time in the video below!
Let’s Get Started!
The main things I wanted test and review about the Karin paint brush pens were:
- How they work on glass… I work on glass all the time with paint pens, so I was super curious how they would do.
- How well they work on black, white, and kraft paper. They technically work on a ton of other surfaces, but glass and paper were the ones I cared about most!
- How they compare to Karin’s regular brush pens. Given a side by side, how different were they from each other?
- How well they blended.
- How durable were they? AKA how easy were they to remove from glass?
Unboxing!
This box of Karin paint brush pens is a pretty huge box with A LOT of pens in it. The full set has seven smaller boxes, and each little box is essentially its own set.
They each have their own set name on the box, swatch cards on the inside of the box, instructions on how to use them, and all of the perfectly laid out pens. Each box also comes with swatch stickers if you want to mix and match your sets. There are seven sets in total – so many beautiful pens.
There’s also a helpful handout/insert with everything you need to know:
- How to store them (keep them in the box – they’re perfectly angled in there!). How to remove them (depends on the surface).
- How to make them permanent (nothing’s ever permanent, but they’re waterproof and can have varnish applied to help fixate them).
- What to do if they dry out, how to blend, and more – super helpful!
More Facts…
According to the insert in the box…
- The paint is pretty similar to acrylic paint. The paint is super opaque and can be used on all sorts of surfaces – paper, glass, wood, metal, plastic, textiles, and lots more.
- They won’t bleed through paper, which is amazing!
- They can be blended until the paint dries, which is also amazing! Typically paint pens dry super fast and chip when you try to blend, so they just don’t blend well at all.
- The paint pens aren’t permanent (no paint pens are), but you can fixate them with varnish if you want to.
- They are non-toxic, organic, pigment-based paints.
Let’s Get Swatching!
Paint pens often need to be shaken up before use. I wanted to swatch ALL the pens, so instead of shaking each one, I shook each box set to do my shaking in bulk. 🙂 Work smarter not harder!
Honestly that didn’t work – I still needed to shake them each individually.
Swatching on the Box
The upstrokes on these definitely weren’t as opaque as the downstrokes, which made perfect sense since I wasn’t applying as much pressure as I did on the downstrokes.
This is definitely different from regular paint pens because the opacity of regular paint pens is the same regardless of pressure. I can’t get thin and thick strokes with a regular paint pen without doing faux calligraphy, so that’s a very obvious difference between regular paint pens and Karin’s paint brush pens.
These paint pens need to be shaken pretty well to be super opaque. For my swatches, I didn’t shake them quite as well as I should have, so my swatches weren’t very opaque. I think they would have been much more opaque if I had spent more time shaking them.
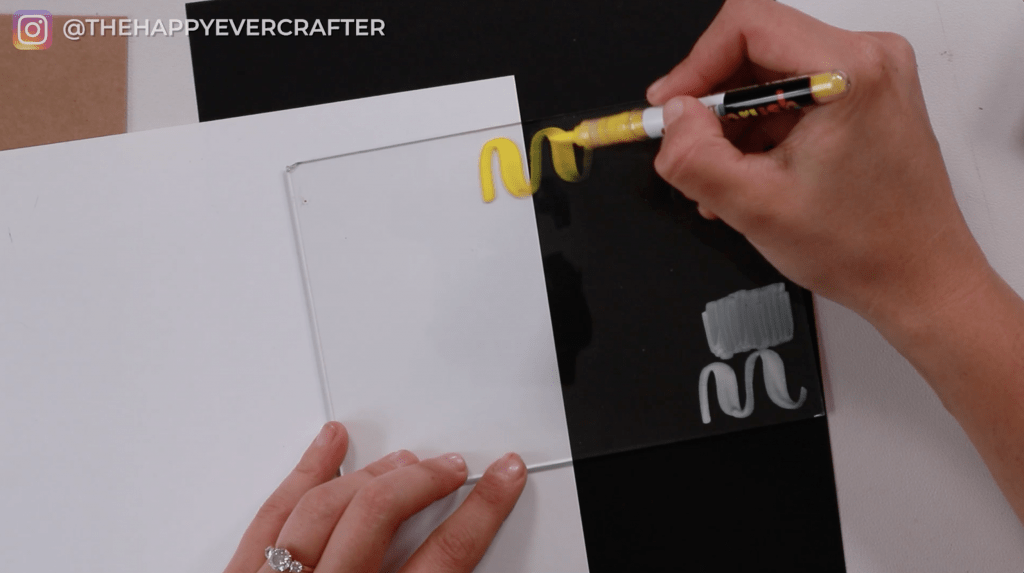
Swatching on Glass
I was dying to test these on glass (paper too but especially glass). I use paint pens primarily on windows and glass, so how they perform on glass was (and is!) super important to me. I was excited about testing them on paper too, but it definitely wasn’t as important to me.
For my glass test, I chose the basic colour set because I specifically wanted to test white and black. Those are the ones I use most often in my window lettering jobs.
Finding a really opaque white paint pen can be really hard, so I wasn’t expecting the white one to be super opaque here…
BUT IT WAS! IT WAS BEAUTIFUL!
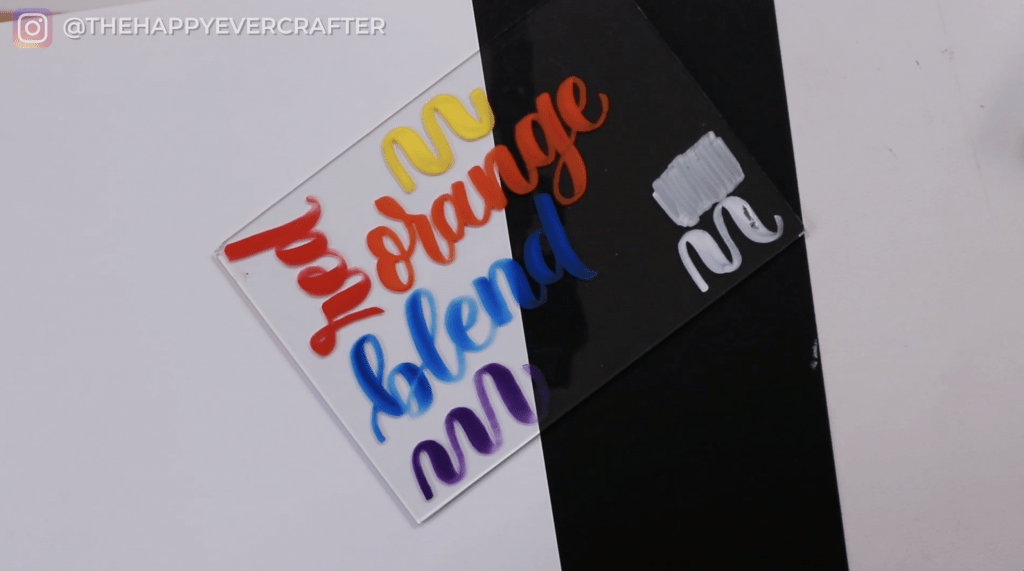
The upstrokes were a little less opaque due to less pressure (which I discussed earlier), which was totally normal – regular brush pens are the same way. But overall, this white paint pen was beautiful. The paint flowed so nicely, and the opacity was great.
Normally with paint pens you have to constantly push the tip down on a surface to get the ink to flow. But with these brush pens, it just came out on its own and was so nice! It wasn’t chipping off, I didn’t have to constantly shake it or push down the tip – so so nice!
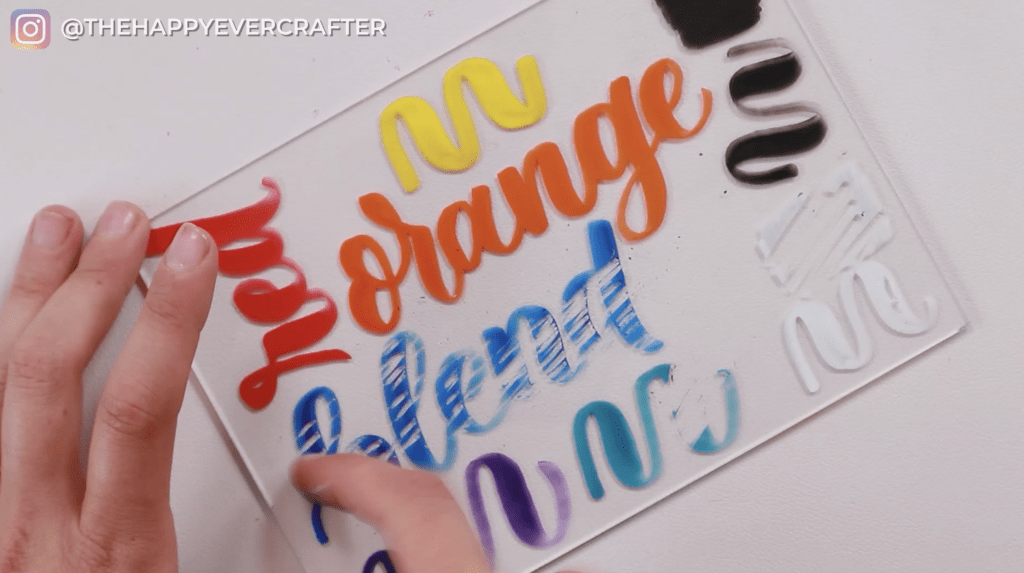
I tried yellow – great! The ink flowed so nicely, and I could go over multiple coats if I wanted (which isn’t possible with regular paint pens). These were really great!
Orange – amazing.
Red – amazing.
I really liked these. They were truly amazing. The upstrokes were lighter for sure, but I actually kind of really liked the look! It was a great effect you don’t get with regular paint pens since regular paint pens have the exact same colour throughout.
Blue – amazing. Purple – amazing. Teal – amazing.
I’m SO happy with these. They will save me so much time!
The black was definitely lighter on the upstroke like I mentioned before. I probably wouldn’t use the black for a big project because it’s not perfectly opaque, but it layered nicely and flowed really well too. Black and white are both really hard to get right when it comes to paint pens, so I wasn’t super surprised that it wasn’t perfectly opaque. They were both still pretty good!
Swatching on Paper
I used the original Karin brush pen and the new Karin paint brush pen in the same colour. I also used white, black, and kraft paper.
The regular brush pen looked great on white paper, disappeared on black paper, and looked fine on kraft paper.
The paint brush pen looked very similar on white paper, definitely showed up better on black paper, and definitely definitely looked more opaque on the kraft paper. I loved how it looked on the kraft paper!
The paper I used wasn’t meant for paint pens (it’s just regular craft store cardstock). The colour stayed on there, but the paint pen ink started to really seep in.
If I had a paper project to do with these, I’d either get a smoother cardstock or even a hot-pressed watercolour paper.
I tried the orange next. Same thing as with glass – more paint on the downstrokes than on the upstrokes. You could barely tell the upstrokes were less opaque on the white paper, but it was definitely more noticeable on the black paper than the white.
Like with anything, some colours looked better on white paper, some looked better on black paper, and some looked better on kraft paper. If you’re going to use these with paper, it really depends on the colour, what you’re going for, etc. This pen set is great though because there are SO many different colours – you can try tons of different colours and shades.
I tried black and white on the different paper colours. Black looked great on white paper and kraft paper but blended right in on the black paper.
The white didn’t look terrible on the black paper (it pretty much disappeared on the white paper). I was honestly a bit disappointed in how the white ink looked on the kraft paper though. The opacity was pretty low, and I know regular paint pens, like Posca, would have better opacity than this one. It’s par for the course with brush pens though – the pressure applied varies so much depending on the stroke.
Overall, these pens definitely worked on glass and definitely worked on paper, which made me really happy!
Let’s Get Removing!
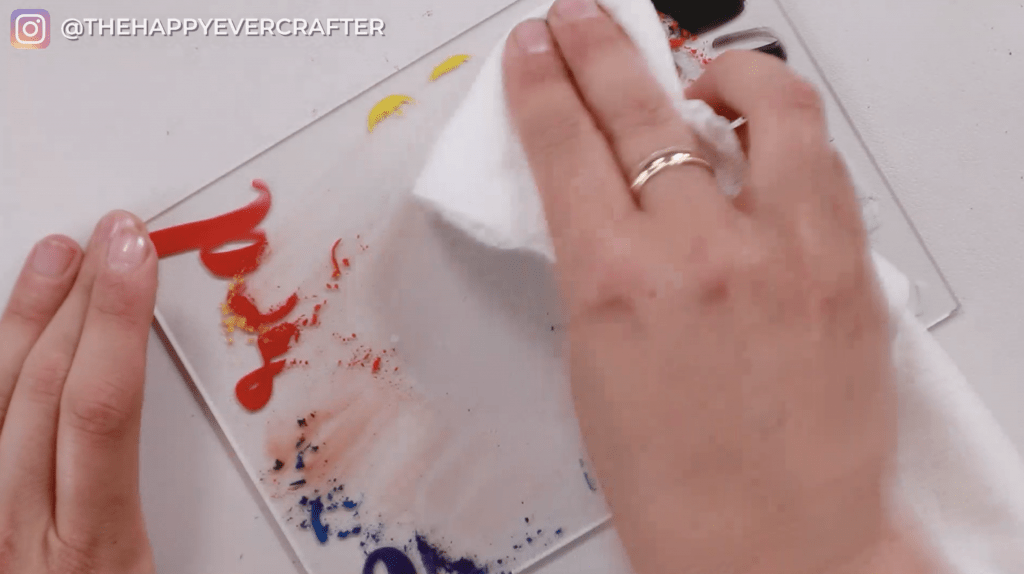
Back to the glass… I really wanted to know how easy it was to remove these paint brush pens from glass.
First, I ran my finger over everything. Nothing budged (which isn’t the case for some pens like chalk pens).
I tried scratching the paint, and it came off pretty easily. This is the case for a lot of paint pens, like Posca paint pens or any water-based paint pens.
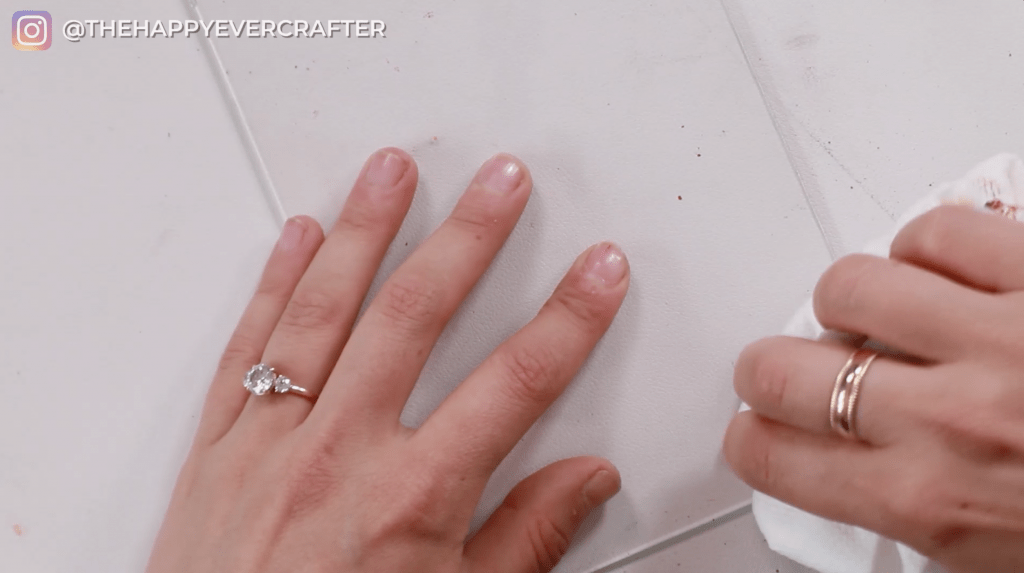
Next I tried a little bit of water on a paper towel. It came right off super easily. This is actually my preference for projects. I like them to be easily removable (for me and my clients) but be resistant to smudges and being lightly touched (like from kids in a restaurant).
Ideal removal scenario for me – water and paper towel! Windex would probably be even quicker.
And if you leave the paint pens on the glass for longer, it might be a little tougher to get off (and may actually require Windex). If Windex ever doesn’t work for you, alcohol or acetone should work. Even a straight razor for quick removal will work (it won’t damage your window). 🙂
Let’s Get Blending!
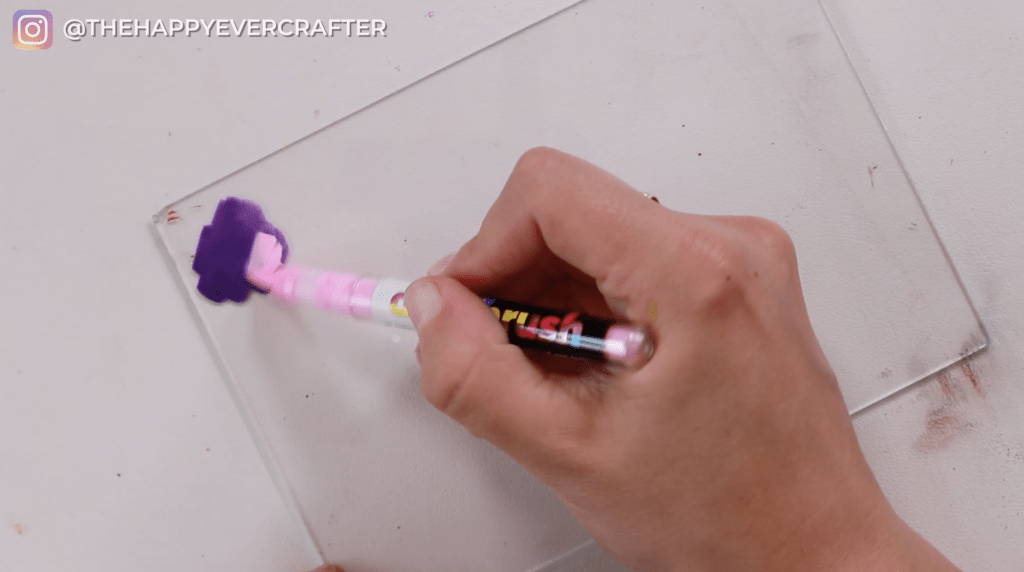
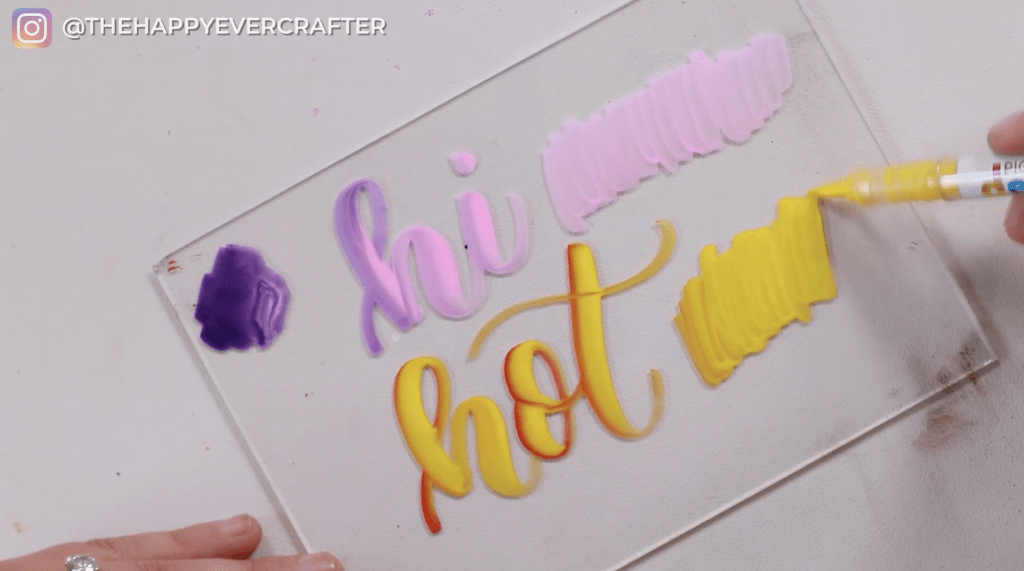
I picked pink and purple to see what happened when I tried to blend them on glass. I didn’t try blending on paper since the majority of paint pen work I do is on glass anyway.
There are a couple ways to blend these.
One way to do that is to make a little pool of your darker colour and dip your lighter colour pen into it.
The colours in these paint brush pens ABSOLUTELY blended! It looked so good! I loved that.
Your lighter colour pen will naturally go back to its original colour as you continue to use it – don’t worry about damaging it.
For another blending technique. I grabbed yellow and red. I gently touched the tip of the red pen to the tip of the yellow pen for a few seconds, and it slowly turned the yellow tip red. It looked so nice when I made a stroke!
Hack: With this method, you need to add the red more frequently if you want more of it in with your yellow.
Don’t worry about damaging your pen. The red came out completely from the yellow pen tip. Good as new!
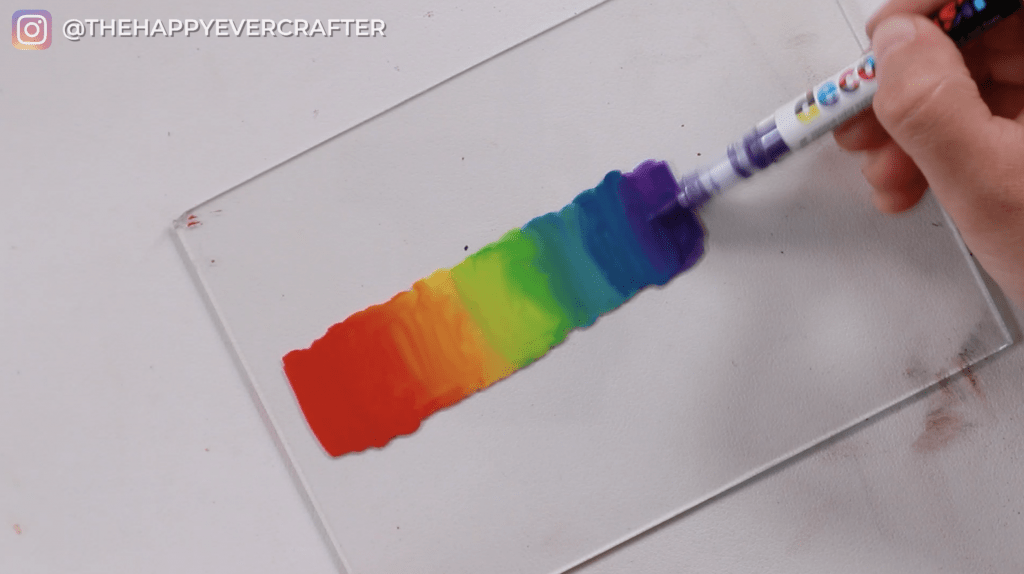
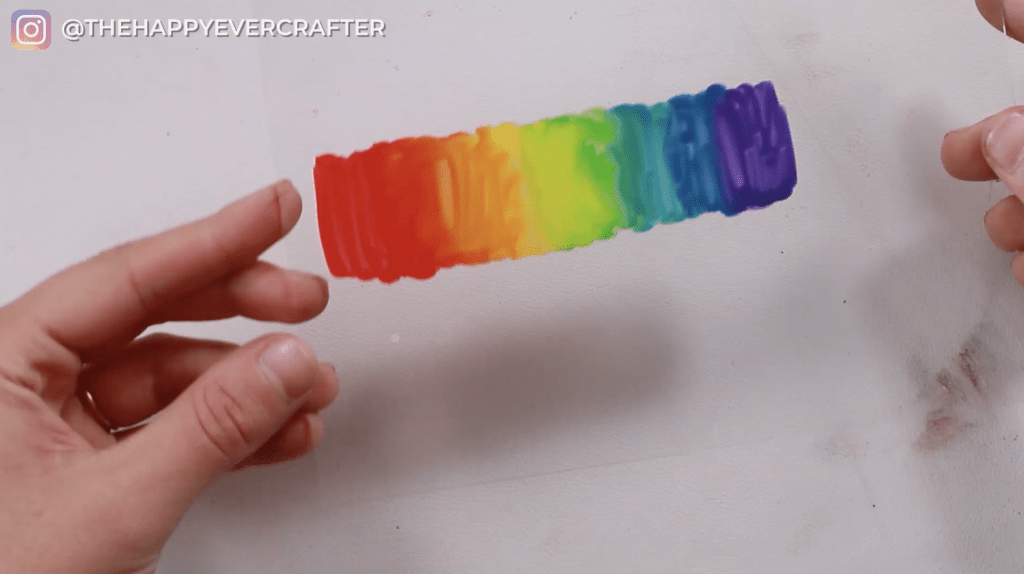
Finally I tried a rainbow blend – red, orange, yellow, green, blue, and violet.
I blended directly on the glass as I went. And they blended SUPER well. The gradient was so nice. This is typically so hard to do with regular paint pens. They dry so fast that you can’t actually blend them (you just have side by side colours).
It was honestly shockingly good. They blended so well together. It was super easy to layer, add more paint of previous colours – it just worked super super well.
And that’s a wrap!
Okay…. I think you got the gist on my feelings towards these pens. I freakin’ loved them. They will save me so much time, and I’m excited for all the projects I will do with them.
If you wanna find these for yourself, here’s the link!
And I think I can leave it at that. Since you made it to the end of this post and seem to like product review post, I’ll send you to another one here!
And finally, your dad joke…
What do you call a pig that paints?
Pig-casso










So helpful and thorough! I cannot wait to try them.
OMG I would LOVE IT if someone sent me a large box of paint markers like these!!!
Brilliant review, as always. Recently watched your how to write on mirrors and loved it. Had such fun but obviously would prefer to not do faux calligraphy. Looks like I need to get me some of these bad boys. Super excited!!
Thank you Becca!!