
MAKE SURE YOU READ TO THE BOTTOM TO JOIN THE FREE SHOW ME YOUR DRILLS CHALLENGE

In calligraphy, you need to start with the very, very basics. These are referred to as ‘strokes’. All of your letters are made up of strokes. So, practice the strokes- over, and over, and over again- until they’re consistent. The more consistent your strokes, the more consistent your letters!
The basic strokes are the foundation to your entire calligraphy alphabet. Today I am going to break down 8 of the basic strokes that will build your calligraphy alphabet and set you on the right path to putting those words together, so let’s look at how the basic strokes are done.

Prefer to watch on video? Just hit play! Or, skip ahead to browse the recap below!
The links below may be affiliate links where appropriate. This means that your purchase through these links may result in a few cents in payment to me, to support creating further resources like this one! That being said, I will never suggest supplies that I do not personally use and fully recommend.
UPSTROKE: Light Pressure
With the upstroke you want to start the bottom and extend upwards with a slight curve towards the waist. You will want to go slow and try your best to stay at a consistent speed. Pro Tip: Don’t “Flick”.

DOWNSTROKE: Heavy Pressure
With the downstroke you will be working opposite to the upstroke. You will want to start at the top and extend downwards starting with medium pressure and gradually adding more as you get to the bottom. Make sure as you approach the bottom you ease off the pressure. Again you will want to go slow and stay at a consistent speed.

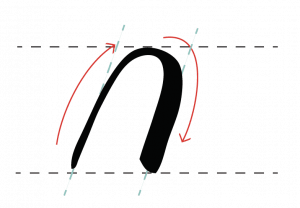
OVERTURN: A combination of the up and down stroke
With this stroke you will want to start at the bottom applying light pressure for your upstroke and then curving over into a thick downstroke. You want to make sure your two lines stay parallel and that all strokes stay on the same plane. Pro Tip: No Flick or tail at the bottom you want to end it straight.
UNDERTURN: Opposite of the overturn
Starting at the top moving downwards you want to apply a heavy pressure going into a light upstroke – you again want to make sure that your two lines stay parallel and make sure to let off the pressure early

COMPOUND CURVE: A combination of the over and under turn
With this stroke you are combining both the overturn and the underturn – the tricky part with this stroke is keeping all 3 lines parallel this time. Some things to watch for is not making points at the top and bottom of the curves, not keeping the middle parallel and making sure not to add a flick or swoosh at the end as pretty as that might look.

OVAL: This is a tricky one and takes some practice!
One of the most important things to remember with this stroke is that you want to start off on the side. Most tend to start at the top and this creates a gap where the lines end up meeting. This one starts with an upstroke light pressure and as you transition at the top into heavy pressure downstroke, then another transition at the bottom back into a light pressure upstroke.
Pro tips: Try not to make the top and bottom pointed

ASCENDING LOOP: This is a fun one!
With this stoke you start in the middle with a light upstroke and adding pressure as you come back down. You will transition at the top and curve down into a heavy downstroke. Make sure everything is at the same angle and that you don’t end up with a tail where the loop extends through.

DESCENDING LOOP: Opposite of the ascending loop!
For this final stroke you will be starting with a heavy downstroke applying pressure until you come back up with light upstroke. Similar to the ascending loop you want to make sure you maintain a steady speed and don’t end up with the loop extending through creating a tail.

Want to actually give these strokes a try with free worksheets and videos?
Join me and thooooousands of others (so far!) in the 30-day #ShowMeYourDrills challenge. I give you my full recommended list of supplies, a huge printable pdf workbook of traceable drills, and a ton of step-by-step videos explaining every basic stroke. FOR FREE.

I promise, a little practice every day will go a LONG WAY. See you there!


I’m signed up for the challenge starting Monday, and I am so excited! Thank you for providing this free challenge!
I quickly just scrolled through the strokes and chuckled to myself in a good way, especially when looking at the oval. Why? I just retired as a third grade teacher who taught cursive to my students for 34 years. No pointed headed round letters! I am looking forward to using my cursive skills on a higher level. Thanks for the encouragement!
I’m as lost as last years Easter eggs when it comes to computer savvy. At this very moment I’m as happy as a clam in deep water. I put in an old e-mail address and cannot access that e-mail account.
My e-mail is alanlee1941@gmail.com
I oh so much can’t wait for your course, and I have absolutely have no idea what supplies I will need for opening night. I also have never used Facebook. Can I still take your course, or will I be outed from the course because my lack of social media connections?
You don’t need social media to do Show Me Your Drills: https://thehappyevercrafter.com/show-me-your-drills/ The course launches in January 2020, and you’ll get a full supplies. list. 🙂
I love it. Never wrote like this before. It’s such a new Avenue and beautiful way of writing!
Love the simplicity! Been practicing brush lettering for a little over a year now here and there. I picked it all up pretty quickly; however, I’m really struggling right now with downstrokes that seem to “drag.” I’m using the Tombow dual brush pen and using HP Choice LaserJet paper that is 32lb for a final project for a Christmas gift. I practice on tracing paper and which is super smooth but cannot get the same smooth result with the HP paper. I’m so stuck and can’t find an answer anywhere! I found your YouTube channel and am so excited to really dive in! Hoping you can help here since I don’t see it in any of the videos yet. Thank you, Becca!
I’ve just started practicing the basic strokes and your videos are proving so helpful! Even just doing these is making me feel so emotionally good!
Very interesting and useful.