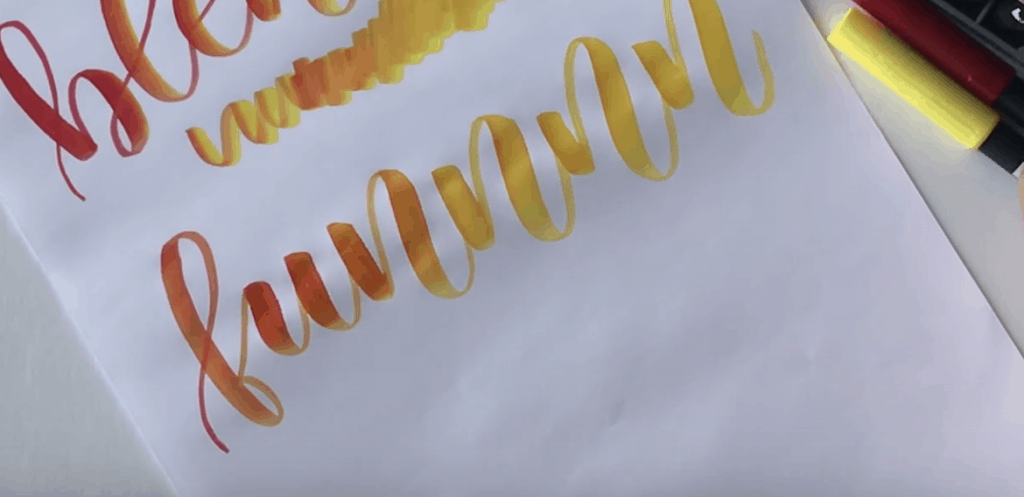
Today I’m showing you a few different techniques for blending colors together when using Tombow Brush Pens! This is for those of you who want a gradient or ombre effect in your calligraphy or want to use multiple colors!
The links below may be affiliate links where appropriate. This means that your purchase through these links may result in a few cents in payment to me, to support creating further resources like this one! That being said, I will never suggest supplies that I do not personally use and fully recommend.
Supplies I will be using for this tutorial include:
Tombow Brush Pens | Rhodia Paper | Tombow Blending Palette | Tombow Blending Brush | Pentel Aquash Water Brush | Watercolor Paper
Make sure to watch my video tutorial below to get the full run down on the 5 techniques to blend colors with Tombow brush pens.
Technique 1:
For this technique you will need the Tombow blending palette (basically a plastic/laminated piece of paper that allows you to mix your colors), Rhodia Paper and 2 Tombow brush pens in contrasting colors. For the this demonstration I will be using red and yellow.
- Put down some red onto the blending palette (you will want to make sure to put the darker color down first)
- Take the lighter color and dip it in the first color you put on the palette.
- Write your word as usual! You will notice it will be quite dark as you start but then the lighter color will start to show through, giving that ombre look. The more you write or the longer your word, the more the pen will return back to it’s original color – in this case, yellow.

Technique 2:
This version is the same at the first one but I will show you how to achieve this if you do not own a blending palette.
Just Take the lighter color marker and draw right onto the tip of it with the darker color!
**Some people get really freaked out by doing this because it can stain the tip of your pen but trust me…….it will go back to yellow!


Technique 3:
This time we will be using the same two pens with the addition of a clear blending pen (this pen comes in most packages of the Tombow dual brush pens)
- Using the blending palette again, put down some red, and put down some yellow in a separate area.
- Use the clear blender pen to grab a bit of each of the colors.
- Start writing as usual! When you write you will notice that the look is slightly different – the colors just won’t be as intense. The blending pen can stain but again the color will come off if you keep drawing and writing with it.

Technique 4:
This time we will add in a third color!
- Choose a third colour that lands somewhere in between the first and second color, in terms of darkness. (ie. choose an orange to go in between a red and a yellow!)
- Starting with the lightest color, write your word out in its entirety.
- Take the darker color and choose either the top or the bottom of the word where you want to make it darker. Carefully go over the bottom of the word and draw overtop of the original light color. You will want to have the same level across the whole word.
- Take the middle color and add that next. As you go, keep blending it with the darker color. You don’t want to make the edge perfect, if you keep it a big jagged it will create a more realistic look. If you feel it needs more you can always add another similar color as another layer!


Technique 5:
Last but not least, my final and most favorite technique uses watercolor paper instead of the Rhodia because we will be working with water in this example. When using water paper it can be harder on your brush pens so make sure to look for either hot pressed watercolor paper or cold pressed water color paper. You will want to make sure that the paper is a smooth as possible. For this you can use a water brush like the Penel Aquash Water Brush or just a paintbrush and water and the same two colors.
- Write your entire word in the lightest color first.
- Take the darker color and apply to the bottom (just like in technique #4).
- Take your paintbrush and dip it in the water.
- Start to blend where the colors meet with the water and slowly watch them blend together.I have to admit that this technique is quite relaxing. Because Tombow pens are water soluble, they blend together beautifully.


There you have it! My 5 techniques for blending colors with Tombow brush pens.
I’d love to hear in the comments: which one is your favorite?!
Want to know all my go-to supplies for projects just like this one?
I’ve spilled all of my favourite supplies into this guide for you.


Hello! I just want to say I think your videos are the most helpful to begin learning handlettering. I’m trying to work on blending and I decided to use the pentel aqua water brush to blend on Canson XL Mix Media paper. Whenever I try to blend with the brush, it blends everywhere and ends up picking up the color that I put down to blend. Am I doing something wrong?
Thank you!
Zainab
Do these techniques work with any watercolour pens? I really want to try technique 2 with my existing brands of watercolour pens…
Do you have any recommendations on the watercolor paper brand to use with the pens that is the best in your opinion?
This tool holds a lot of power and even allows you to discover various effects in every stroke. That’s why it is one of my favorite art pens. Thank you for taking you time for writing this post.